Only One: How to Remove Windows Genuine Advantage Notifications (Method 2)
edit Tips
* This process will only get rid of the notifications, and will not validate your copy of XP. It will remove the timer at the beginning of your XP log on, the white notice on the log on screen, and the annoying yellow star that appears in the bottom right corner of the screen.
Ads by Google
Auto Restart Crashed Apps
Automatically restart crashed apps. Survive crashes/hangs/leaks/etc.
www.CoreTechnologies.com
* This is easier to do if you have someone reading the steps to you while you do it.
* You may need to Find Hidden Files and Folders in Windows to get to System32 manually.
* If task manager programs are moving, click the title of the "image name" row to freeze them.
* If you are having problems after this, disable the updates before rebooting.
* There is a program called RemoveWGA which does all of this for you. Just run the program, click yes, and you're done. (See External Links, below.)
* If you have problems changing files in the System32 directory, you will have to turn off "system restore". "Start" -> "Control Panel" -> "System" -> "System Restore" -> Check the "Turn off system restore" check box.
* You will not be able to download Automatic Updates anymore. This is not to say you cannot update your system anymore, Microsoft just won't do it for you. In the links, there is a program that will allow you to update any system, regardless of if it is genuine or not.
* You can also rename WgaTray.exe to WgaTray.exe.bak if you can't remove WgaTray.exe from your Taskbar. Press Ctrl+Shift+Escape to do so.
* It will be useful to have task manager open first before deleting WgaTray.exe
* Unlocker is a free program that can assist in removing WGA notifications.
Showing posts with label Software. Show all posts
Showing posts with label Software. Show all posts
Thursday, July 01, 2010
Friday, June 04, 2010
Office 2007 Genuine Advantage Validation Activation

Ohh No!!!!...... My Microsoft office 2007 NOT PASS of Genuine VALIDATION. This happen when i try to update my computer.... huhuhuhu... just try.... Then i think it will be OK when i m reinstall it back.. But it wrong..... the validation advantage still there and detecting my Microsoft office is not genuine....
Thank GOD because some of our friend on net upload the solution.... Just following that;
To bypass or crack the Microsoft Office 2007 and Microsoft Office 2003 OGA genuine validation, download and
just click the *.reg file, and reboot your computer.
Download
If you need sn:
Download
Alternative way (old way):
- Install and activate Microsoft Office 2007 or other version of Office. If you intend to use the key-gen, you must install Enterprise edition.
- Download the patched OGACheckControl.dll.
- If you never validate your copy of Office, go to Genuine Microsoft Software web page, and run the Office Validation Assistant by using Internet Explorer (not Firefox as it will use different version of ActiveX component). This is to install the components required for Office validation. If you fail the validation – Office not genuine – simply ignore the message.
- Copy the cracked ogacheckcontrol.dll to the following location:Windows XP and Windows Vista (32-bit): \Windows\System32\Windows XP and Windows Vista (64-bit): \Windows\SysWOW64\
- Attempt to download Office files that require validation again. All downloads should work now.
You can also try to download this office 2007 activator.
Download Office 2007 Activation Crackgade say: Thanks for FREEMEDIA for share for the solution. NOW.... My Microsoft Office 2007 is pass of the validation... yeeaaHHH!!!!........
Wednesday, June 02, 2010
How to Remove Windows Genuine Advantage Notifications (Method 2)

Rename Method
1.
Open a CMD window by clicking on Start -> Run -> type CMD and click OK.
2.
Open a Notepad window (Start -> Run -> type NOTEPAD click OK) and type or copy (select the lines, and then press ctrl-c) the following lines and paste (ctrl-v) into the Notepad window:
* CD %systemroot%\system32
* rename wgatray.exe wgatray.exe.bak
* rename wgalogon.dll wgalogon.dll.bak
* rename LegitCheckControl.dll LegitCheckControl.dll.bak
* taskkill /F /T /IM wgatray.exe
* del wgatray.exe.bak
* del wgalogon.dll.bak
* del LegitCheckControl.dll.bak
3.
Make sure there is a enter character (blank line) after the last line, select the entire Notepad contents (ctrl-a) and copy to the clipboard (ctrl-c)
4.
Paste the clipboard into the CMD Window (right-click paste)
5.
This should kill the wgatray.exe process and delete the files it uses.
gade say: This is another way to kill the windows genuine advantage.
Sunday, May 23, 2010
How to Remove Windows Genuine Advantage Notifications (Method 1)
 originated by:BrettCapewell, Horses4Ever, Anonymous, Brett (see all)
Article pencil Edit Discuss View History
Windows genuine advantage notifications occur when your computer hasn't passed the validation test. The validation test can be failed due to being sold a pirated (non-genuine) copy of XP, or because you have changed your XP product key to a software-generated key, or sometimes it just happens for no reason at all. The failed validation installs three types of notifications on your computer: one on the log in screen, one log in timer, and one balloon. It also stops updates from Microsoft and disables your ability to install IE7 and Windows Media Player 11. This solution can get rid of all three notifications, even though you will still not be able to update through Windows Update. You will not be able to download things from Microsoft that requires a valid license either.
edit Steps
Delete Method
1.
If you have only just installed Windows Genuine Advantage notifications, simply using the system restore function will remove the program. Then refuse to accept the WGA update next time Windows updates. Otherwise, proceed as detailed below. (NOTE: If you try these steps while you are in "Safe Mode," step #8 is unnecessary).
Ads by Google
Hot CopyPaste 4.0
Enhances Windows Clipboard. Download your evaluation version...
www.WindowsClipboard.com
2.
First, try the following:
3.
Open a CMD Line Window by Clicking on Start ==>Run ==> type CMD and Press OK.
4.
Change Directory into the System32 Folder (Like Cd c:\Windows\System32)
5.
Open a notepad Window and type the following lines:
* taskkill -IM wgatray.exe
* del wgatray.exe
* del wgalogon.dll
6.
Highlight and copy to the Clipboard the three lines above
7.
Paste the contents of the Clipboard to the CMD Window
8.
This should kill the wgatray.exe Process from the Taskbar and immediately delete both files wgatray.exe and wgalogon.dll without the need to to go through all steps bellow.
9.
If that does not work, then continue and follow the steps below;
10.
10
Open System32 by either A or B of the following methods:
* a) Click "Start", "Run", then type-in "System32". Click "Okay".
* b) Find System32 manually by clicking "Start" > "My Computer" > "(X:)"
(Replacing "X" with the drive letter of the host of Windows) > "Windows" >
"System32".
11.
In "System32", go to "Tools" > "Folder options" > click on the tab, "View" > Uncheck "Hide extensions for known file types". Now you can begin...
12.
Check to make sure the window that comes up has a full screen of various files. The files are in alphabetical order, which makes it easier to locate the specific file.
13.
Find "WgaLogon.dll" and rename it "WgaLogon.dll.bak".
14.
Create an empty copy of WgaLogon.dll:
* Right click on a blank space in System32 and select "New" > "Text Document".
* Leave the text document empty and label it "WgaLogon.dll".
Press Enter (on your keyboard).
* You may get a warning from the above step that says,
"If you change a file name extension, the file may become unusable.
Are you sure you want to change it?". Click "Yes" on this warning.
15.
Be ready to complete the next two steps very quickly! Find "WgaTray.exe" in "System32" and delete it. You will then have 5 seconds to find "WgaTray.exe" in the Task Manager (the next step). NOTE: If you remove the files mentioned above while you are in "Safe Mode," step #8 is unnecessary.
16.
Immediately open Task Manager. You can do this by pressing the Ctrl, Shift, and Esc keys simultaneously, pressing the Ctrl, Alt, and Delete keys simultaneously, or right clicking the Taskbar and selecting "Task Manager". Click on the process tab and click end process when "WgaTray.exe" is selected. Note: If you take longer, do not panic! All that will happen is that "WgaTray.exe" will keep reappearing in the processes list (i.e. you won't be able to delete it as required). To remove the notifications after this, return to system32. You will find two files:"WgaLogon.dll.bak" (the one you renamed) and an Application Extension (0KB) called "WgaLogon.dll". Delete the Application Extension, rename "WgaLogon.dll.bak" to "WgaLogon.dll" and repeat the steps from the fifth one onwards (at a greater speed!!).
17.
Restart your computer once you have finished. All the notification messages should be gone.

gade say : This is one of the method, the other method i will post soon. But i don't know if it will be same prosess or method for windows vista and windows 7. But for me it better to install the genuine windows. I got one from internet(www.piratebay.org).....
Thursday, May 13, 2010
How To Build Blog AND SnapDrive
 We host most file extensions. Your data is safe with SnapDrive! | |
 FREE Accounts include 5GB of space! Upload files via your mobile phone through Snapit.mobi! | |
 We make it simple to upload, share, store and manage your files with the Easy to Use control panel. | |
 Share your photos with all your friends and family. Show off your photos today! | |
 Quickly upload code to display music and videos to your website, MySpace or Xanga profile. | |
 Create direct links to download and access files to email, instant messaging, web pages, forums and even your mobile phone! |

gade say : Bagus juga ni.. kita boleh upload doc yang kita ingin kongsikan.... cuma, untuk yang free punya agak limit la... 2MB saja boleh upload dalam satu masa.... lebih dari itu kita kena pisah2kan and upload laaa....
Wednesday, October 29, 2008
Ubuntu 8.10 release....!!!!!!
The final stable version will be released on October 30th, 2008.
waaa... the new ubuntu version will coming soon... waaa it tommorow....
can't wait for it.... come try it........ try something diffrent....
Tuesday, October 07, 2008
How to Format a Computer with Windows 95, 98, or ME
 | Download the Startup Diskette Creator |
Note: We recommend using the Startup Diskette available on this page. Other Windows Startup Diskettes may not work with the following steps.
- Once you have your Startup Diskette, insert it into the floppy drive and restart your computer.
- Select option #1 - Start the computer with CD-ROM support.
- After a minute or so, you will see "A:>_".
- Type "fdisk" and press Enter.
- If asked to enable large disk support, select Y for Yes. (Note: Some versions of Windows 95 may not be compatible with large disk support. Select N here if it does not support the FAT32 file system.)
- Select Option #1 - Create DOS partition or Logical DOS Drive.
- Select Option #1 - Create Primary DOS Partition.
- The drive integrity will be verified.
- Unless you are planning to make multiple partitions, select Y when asked if you want to use the maximum available size for the partition and to make the partition active.
- The drive integrity will be verified again.
- When completed press the Esc key to exit fdisk.
- Without removing the floppy disk, press the reset button on the computer or press the keys Ctrl then Alt then Delete and release them together. This will restart the computer.
- Again, select the option to Start the computer with CD-ROM support.
- When you see A:>, directly above it is a message about your CD-ROM drive. It will tell you the letter assigned to your CD-ROM drive, take note of it.
- At the A:>, type "format C:" and press Enter.
- Press the Y key then the enter key when asked if you want to proceed with the format.
- The format will probably take some time, so be patient.
- You will be asked to choose a Volume Label, which is a name for your hard drive. It has no effect on the operation of your computer, you may choose any name you like.
credit to: www.whitecanyon.com
Sunday, October 05, 2008
How to Format a Computer with Windows XP
- To format a computer with Windows XP or 2000, insert Windows CD and restart your computer.
- Your computer should automatically boot from the CD to the Windows Setup Main Menu.
- At the Welcome to Setup page, press ENTER.
- Press F8 to accept the Windows XP Licensing Agreement.
- If an existing Windows XP installation is detected, you are prompted to repair it. To bypass the repair, press ESC.
- Use the ARROW keys to select the partition or the unpartitioned space where you want to create a new partition. Press D to delete an existing partition, or press C to create a new partition.
- Type the size in megabytes (MB) that you want to use for the new partition, and then press ENTER, or just press ENTER to create the partition with the maximum size.
- Select the format option that you want to use for the partition (Recommended: NTFS), and then press ENTER.
- After the Windows Setup program formats the partition, follow the instructions that appear on the screen to continue installing Windows.
Tuesday, September 30, 2008
Antivirus research.... check it out....
Haiii everyone....
I have a long time search for the best antivirus.. and finally i found the latest comparison of antivirus below:-
| avast! Professional Edition 4.8 AVG Anti-Virus 8.0 AVIRA AntiVir Premium 8.1 BitDefender Antivirus 11 eScan Anti-Virus 9.0 ESET NOD32 Anti-Virus 3.0 F-Secure Anti-Virus 2009 G DATA AntiVirusKit (AVK) 2009 Kaspersky Anti-Virus 2009 McAfee VirusScan Plus 12.1 Microsoft OneCare 2.5 Norman Antivirus & Anti-Spyware 7.1 Sophos Endpoint Protection 7.5.1 Symantec Norton Anti-Virus 2009 TrustPort Antivirus Workstation 2.8 VBA32 Scanner for Windows 3.12.8.2 |
All information i collect from this website http://www.av-comparatives.org/
gade say:
Now i'm using kaspersky 8.0, so i thing it is right choose.. hehehe
Monday, August 18, 2008
Open driver...
heloo everyone...
One thing i want to share with us today is where to download driver or everything on internet... this few day i have read the buletine and request of my friend ask "where to download the driver on internet".... may be we have a old2 hardware like printer, scanner, or notebook and so on. i have found a website that have publish this kind of driver to download. here we can download all driver like notebook driver,pda drive, modem drive, sound drive, and so on.... we can search by category or Manufacturers....
All this we can download here. so check this out.....
Friday, August 15, 2008
Windows XP2 vs Vista SP1
I'm always need a experience with windows... and now need something new but need to serve which the best. i using XP sp3 right now and i wan to considering to install vista on my laptop. i have been using vista before but i reinstall because the windows is corrupted. here is something i got form internet and u all can read it.... this is compression vista and xp.
XP sp2 vs Vista RTM vs Vista sp1 gaming benchmark - page1
XP sp2 vs Vista RTM vs Vista sp1 gaming benchmark - page2
XP sp2 vs Vista RTM vs Vista sp1 gaming benchmark - page3
and the leates is Vista sp2 vs XP sp3
XP sp2 vs Vista RTM vs Vista sp1 gaming benchmark - page1
XP sp2 vs Vista RTM vs Vista sp1 gaming benchmark - page2
XP sp2 vs Vista RTM vs Vista sp1 gaming benchmark - page3
and the leates is Vista sp2 vs XP sp3
Thursday, August 14, 2008
MP3 VS WMA. Which one the best??
There are just a few audio compression formats out there, just like there are only a few image compression formats (you may have heard of them: JPG, GIF, BMP). Two of the most popular audio formats are WMA, or Windows Media Audio, and MP3 (Short for MPEG, Moving Pictures Experts Group, Audio Layer 3). WMA is the older audio format, produced by Microsoft, to work with Microsoft's Windows media player. The WMA compression format was designed specifically for this format, and thus can not be converted to other audio formats.
The audio quality of WMA and MP3 audio formats tends to be noticeably different. WMA is a decent quality audio format when streaming at phoneline speeds (maybe 30kbps or so). At such speed WMA almost reaches an FM level of audio quality, although not quite. At 128kbps, Microsoft claims the WMA is nearly CD-quality, although many would deny this. WMA, however, is not to be completely looked over. The compression provides relatively small audio files and they require less processing power to execute. It thus retains a deminishing niche as MP3 has become more popular and widely used.
The MP3 audio compression was developed in Germany in 1991 by the Fraunhofer Institute. MP3 typically provides higher quality sound than WMA because it uses perceptual audio coding to compress CD-quality sound by a factor of 12. As a result, MP3 has become almost the universal standard among audio usage and broadcasting. It provides CD-quality sound at reasonable compression sizes and high streaming speeds. Watch out, however, at low bitrates, as MP3 quality will likely suffer.
Bradley James is a senior editor at SciNet.cc, a website containing many helpful consumer electronics review articles. For more information on MP3 and WMA audio formats, please visit our MP3 vs. WMA webpage.
Article Source: http://EzineArticles.com/?expert=Bradley_James
More information about MP3 and WMA, u all can click here to see the difference between it...(by Microsoft)
for me i will prefer on WMA if u play at ur PC/laptop... because it small size then MP3. But the most importance is the ear that listening the music....
Tuesday, August 12, 2008
IE7
How to Install Internet Explorer 7.0 Bypassing Genuine Windows Validation...
 Internet Explorer 7.0 is the long awaited tabbed web browser by Microsoft. Nearly four years after the release of Internet Explorer 6.0, in the face of growing competition from Mozilla's Firefox, Microsoft has finally given the old IE platform a facelift. Optimized design along with new cool interface, favorites centre, search box, RSS feeds and most importantly easy to use tabbed browsing are the exclusive features of this new internet explorer.
You must have Windows XP Service Pack-2 (SP2) in order to install Internet Explorer 7.0. But still you will face a problem while installing this new Internet Explorer if your copy of Windows XP is not a genuine (non-pirated) one, since IE 7.0 installation requires genuine windows validation!!! So what to do??? Don’t worry… There are some tricky steps through which you can install IE 7.0 even in your pirated copy of windows XP bypassing the genuine windows validation. You just have to follow the following steps one by one:
- Download Internet Explorer 7.0 installer from the Microsoft site. You have to choose Windows XP Service Pack 2 (SP2) as your operating system. Remember you can’t install IE 7.0 if service pack 2.0 is not installed in your operating system. And if you are facing genuine windows validation problem while downloading IE7 installer from the Microsoft site, can also download this installer alternatively from here or directly from here.
- Extract the downloaded Internet Explorer setup file (IE7-WindowsXP-x86-enu.exe) using WinRAR to a directory (IE7-WindowsXP-x86-enu).
- Download the patched iecustom.dll and then copy-paste it to the update folder (IE7-WindowsXP-x86-enu\update\) and click yes when asked to overwrite.
- Now, download normaliz.exe . Then copy this exe file and paste it in your “c:\” drive.
- Run ‘update.exe’ in the update folder (not iesetup.exe!!!). At the end, you have to choose ‘Restart Later’ (not Restart Now) option to finish the running process of the exe file.
- Now you have to download normaliz.dll and then copy-paste it to “c:\windows\system32\” directory (in order to prevent problems with the file not being found after the installation). And then reboot/restart your pc.
- After rebooting your pc, you may face a problem with a file called normaliz.dll that can not be found by explorer.exe. If you’re having this problem, you will find your desktop blank.(If you are not facing this problem then just go to step 8) In order to fix this problem, you have to do the following things one by one:
- Press ctrl-alt-del to go to the task manager.
- Go to “File -> New Task (Run…)” in the task manager.
- Type: ‘C:\normaliz.exe’ (excluding quotation marks) in the ‘open’ field and then press the ‘ok’ button.
- ‘WinZip Self-Extractor - normalize.exe’ window should popped up and then press the ‘unzip’ button.
- Reboot your pc and yahoo!!! now you can see your desktop contents!!!.
- Now you have to run ‘xmllitesetup.exe’ in the update folder. This step is very important, because somehow if you forget to run this ‘xmllitesetup.exe’ , IE 7.0 will be installed in your PC without it's toolbar!!!
- Then reboot your pc again, run Internet Explorer…and you are done!!!
Saturday, August 09, 2008
WMP11
How to Install Windows Media Player 11.0 Bypassing Genuine Windows Validation...
Windows Media Player 11.0 is the latest Media Player by Microsoft. It offers great new ways to store and enjoy all your music, video and pictures along with its new cool look. You must have Windows XP Service Pack-2 (SP2) in order to install Windows Media Player 11.0. But still you will face a problem while installing this new Windows Media Player if your copy of Windows XP is not a genuine (non-pirated) one, since WMP 11.0 installation requires genuine windows validation!!!
But there are some tricky steps through which you can install WMP 11.0 even in your pirated copy of windows XP bypassing the genuine windows validation. You just have to follow the following steps one by one:
- Download Windows Media Player 11.0 (make sure its the final and latest version, not beta) from the Microsoft Site. Alternatively, you can download the installer file directly from here. Remember you can’t install Windows Media Player 11.0 if service pack 2.0 is not installed in your operating system.
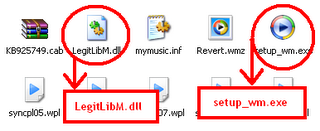
- Extract the downloaded Windows Media Player setup file (wmp11-windowsxp-x86-enu.exe) using WinRAR to a directory (wmp11-windowsxp-x86-enu). Now make sure you have a “LegitLibM.dll” file in the extracted “wmp11-windowsxp-x86-enu” folder.
- Download the patched LegitLibM.dll and then copy-paste it to the “wmp11-windowsxp-x86-enu” folder and click yes when asked to overwrite.
- Now run “setup_wm.exe” file in the “wmp11-windowsxp-x86-enu” folder.
- Restart your PC, then run your Windows Media Player and you are done!!!

Friday, August 08, 2008
ubuntu....
wow.....
really fun use ubuntu one of the linux OS... it fast then windows xp..
but to install the application such as .exe, is has some problem... it can be install using "wine"... buy in the end, it not function like we expected...
4 example.. i install YM on ubuntu using wine.. it can be install but when i'll try to login, the icon is gone.. bla,,,bla.... hemmmm..... much need to learn....
but is good and best experience....
emm now i m boots both of windows xp pro sp3 and ubuntu 8.04....
Thursday, August 07, 2008
WSP 2 VS WSP 3
huhuhu... what are the different about wsp 2 vs wsp 3?...
i have reads some article of this question but i still dont know the different of this tow...
Here is some research by someone...
i have reads some article of this question but i still dont know the different of this tow...
Here is some research by someone...
Windows Defender Bypass Genuine
How to Install Windows Defender Final bypassing Genuine Windows Validation...
Recently Microsoft has released the final version of Windows Defender, the Free Anti Spyware from Microsoft. But still you will face a problem while installing this new Windows Defender if your copy of Windows XP is not a genuine (non-pirated) one, since Windows Defender installation requires windows genuine advantage (WGA) validation! SO what to do ?? But there are some tricky steps through which you can install Windows Defender Final even in your pirated copy of windows XP bypassing the genuine windows validation. You just have to follow the following steps one by one:
- At first, download Windows Defender Final from the Microsoft Site. Alternatively you can download it directly from the link below (32 bit or 64 bit processor):
- Then download Orca (a .msi package editor) from the link below:
- Now extract Orca, you have just downloaded, using Winzip or any file decompressing tool you like. And then install it (Orca.msi) in your PC.
- Now right click on the WindowsDefender.msi, you have downloaded in step 1, and select 'Edit with Orca'. Then Windows Defender will be opened with Orca as the following window popped up:

- In the Orca’s left pane, click on CustomAction.

- Now right click on the CHECK_WGA in the right pane...
 and then select 'Drop Row'.

- Again on the left pane of Orca, just click on the 'Dialog'.

- And select CheckWGA on the right pane...

- Then double click on the Attribute value of CheckWGA in order to change its value from 2(two) to 0(zero).


- Finally save the modified WindowsDefender.msi from File -> Save. (you have to select save, not save as).

- Now install Windows Defender Final by running the WindowsDefender.msi file, you have just modified. And then you are done!


Tuesday, August 05, 2008
Microsoft Private Folder
How to Install Microsoft Private Folder Bypassing Genuine Windows Validation...
 Microsoft Private Folder is a useful tool for you to protect your private data when your friends, colleagues, kids or other people share your PC or account. With this tool, you will get one password protected folder called My Private Folder in your account to save your personal files.
Microsoft Private Folder is not intended to provide security against hackers. It is a utility that limits access to selected files by other people that you trust and share your computer with, such as at home with your family. Users must make sure they remember the password. Without the password, they cannot unlock the private folder and cannot access any of the files or folders it contains.
But you will face a problem while installing Microsoft Private Folder if your copy of Windows XP is not a genuine (non-pirated) one, since Microsoft Private Folder installation requires genuine windows validation!!! So what to do??? There are some tricky steps through which you can install Microsoft Private Folder even in your pirated copy of windows XP bypassing the genuine windows validation. You just have to follow the following steps one by one:
■ Manual Installation:
- At first, download Microsoft Private Folder from here in .RAR format and extract MSPF10ENU.rar using WinRar. Then you will get MSPF10ENU.msi (Microsoft Private Folder Installer).
- Then download Orca (a .msi package editor) from the link below:
- Now extract Orca, you have just downloaded, using WinRar. And then install it (Orca.msi) in your PC.
- Now right click on the MSPF10ENU.msi, you have downloaded in step 1, and select 'Edit with Orca'. Then Microsoft Private Folder Installer will be opened with Orca as the following window popped up:

- In the Orca's left pane, click on InstallUISequence.
- Select the action WelcomeForm from the right pane of Orca.

- Now Double-Click the condition value of WelcomeForm, and change its value from Installed=”” AND NOT RESUME to Installed=”” AND RESUME (only you have to to delete the word NOT).

- Finally save the modified MSPF10ENU.msi from File -> Save. (you have to select save, not save as).
- Now install Microsoft Private Folder by running the MSPF10ENU.msi file, you have just modified. And then you are done!


■ Direct Installation using Patched Installer :
Sunday, June 29, 2008
How To Fix A Slow Computer

Do you want to learn how to fix a slow computer? Most likely you are a computer user, but have no idea about why your computer starts to slow down over time. Having experienced a slow computer myself, I was finally able to clean up my slow computer and make it run like brand new again.
What I Did To Fix My Slow Computer
To make your computer run faster again, you will need to repair your registry files. They are the files in your computer registry that give the software and hardware the instructions to run properly. A computer registry filled with errors will cause the computer to slow down, because the applications get stuck while running. Another result of a bad registry is the frequent freezing of the computer.
How To Fix Your Computer Registry
The computer registry is a component of the computer that is not regularly talked about, yet it is one of the most important. Most people have no idea about a computer registry, even after years of using their own PC.
Fixing your computer registry requires you to download a good registry cleaner. Try not to fix your registry by yourself, because any mistakes made may be fatal to the system. The registry cleaner I used managed to detect all the errors in my computer registry, and proceeded to clean up all of them. The whole process took about 10 minutes to complete. To download the top registry cleaner on the internet, visit my website link below to learn more about the best 5 registry cleaners.
Is your computer always slow or freezing? Read the author's review of the Best Registry Cleaners on the market now at http://www.review-best.com/registry-cleaner.htm and completely clean up your computer registry in 2 minutes!
Article Source: http://EzineArticles.com/?expert=Austin_Porter
Wednesday, June 04, 2008
Back-up MySQL database...
Long time to search how to do it... and the end... it already on my eyes....
1. Open MySQL query browser...
2. Go to "Tools"
3. Click "MySQL administrator"...
4. Go to "Backup"..
5. Click "New Project".. name you backup
6. Add database that you need to backup... and click "execute backup now"
7. And that it.... good luck!!!
It seem like this...


1. Open MySQL query browser...
2. Go to "Tools"
3. Click "MySQL administrator"...
4. Go to "Backup"..
5. Click "New Project".. name you backup
6. Add database that you need to backup... and click "execute backup now"
7. And that it.... good luck!!!
It seem like this...

Subscribe to:
Posts (Atom)